
Aquatic Invertebrates of Montana
Slide Mounting
Introduction
Slide mounting of small or rare specimens provides the most permanent and most secure means of long-term storage while allowing easy access for study. Slides mounts allow the quick comparison of many specimens and they insure the label data stays associated with the specimens. Slides can be viewed under either a dissecting microscope or under with a compound microscope. They may be viewed lighted from above or with transmitted light. The biggest disadvantage is that the specimens cannot be moved once the slide is made.
The best permanent slides use Canada balsam or synthetic resin substitutes in xylene. Water or alcohol based substitutes are generally inferior and they can be just as unhealthy.
Specimens
Slide mounting is appropriate for specimens that are shorter than about 20 mm and thinner than 1 mm when compressed under the slide. Long and thin specimens (worms) can be bent or cut into pieces. Larger specimens should be mounted as parts only (mouth parts, genitalia, wings, etc.).
Clearing
Bulky soft tissues should be mostly cleared away before further processing. Insect exuviae are perfect for slide mounting and clearing should mimic this condition. Some specimens, such as many worms and most planktonic crustaceans will clear sufficiently in the final xylene bath. The larger, tough specimens should be carefully heated in 10% KOH or NaOH. It may be necessary to open the body cavity to get good clearing action. Smaller or more delicate specimens can be cleared in Amman's lactophenol or lactic acid. These may also be heated for quicker results. I recommend heating the clearing agents rather than leaving them unattended. The clearing fluids should be thoroughly rinsed away and the specimens returned to 50-70 % ethanol.
From this point on I keep the specimens in a tall, narrow screw-cap vial. The different fluids may be added and removed from the vial directly or with a eye dropper and the contents mixed by inverting the vial. The goal is to discard the fluid, but keep the specimens in the vial. Also important is to keep track of the label data and what the current fluid is. I label the vial caps with a code and keep the decoding data handy because the chemicals will often destroy other labels. I store the vials in a rack where different sections indicate the fluid contents.
Staining
Many clear to milky colored specimens should be at least lightly stained. A couple drops of stain in a small volume of 50-70% ethanol should work in a few hours to overnight. Rose Bengal, alum carmine, Congo red and many other may give good results. Overly stained specimens may be difficult to see through. Double staining or mixing stains sometimes helps as different structures (or different species) are differentially stained.
Dehydration
The next step is to get the sample from 50-70% ethanol to anhydrous alcohol. This should be done slowly by increasing the strength of the alcohol until all of the water is lost from the sample. I usually have several samples at various points in the process all the time, and I may take a few days to get through the complete dehydration series for any one sample. This works better than trying to rush a single sample through. Most of the excess stain should be removed before going above 70%. The final 5% water can be the most difficult. Pure anhydrous ethanol will actively absorb about 5 % water.
Xylene bath
The final fluid change is from anhydrous alcohol to xylene. If there is much water still present in the specimens they will cloud-up and cannot be mounted. In this case, try the dehydration series again. The xylene bath will clear the specimens by removing fats and oils, but this may take a few hours or more. Some specimens, such as oligochaetes, may get bridle if they are left in xylene for more than a couple hours.
Mounting
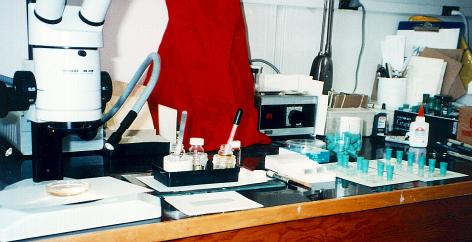
At this point the work area should be clean, well organized and well ventilated. I have vials of xylene, dilute resin and full strength resin glued into a small tray to prevent spilling. I use index cards under everything to aid in cleaning up any spills. I store the dissection tools in the xylene vial to keep they from gumming up. I place the specimens in a small petri dish with a concave bottom. For larger specimens it is very helpful to replace the xylene over the specimens with dilute resin and let is soak in a little. This will prevent the specimens from diluting the resin on the slide too much and it greatly reduces the formation of air bubbles within the specimens. Slides should be clean before adding a patch of resin to the slide. The volume of resin patch should be just enough to fill the area under a cover slip. If the specimens are thick and not to be flattened, add appropriate spacers to the corners of the resin patch, but dunk them is xylene first. The patch of resin should be far enough from the ends of the slide so that the cover slip is not touched by the slide box. You might use 2 resin patches each with its own cover slip on each slide for mass production of specimens.
Transfer the specimens to the resin patch on the slide, then check the slide for air bubbles, debris or unwanted specimens. If any of these are present they should be removed with the forceps and released into the xylene holding jar. This is also the time to position the specimens and do any last minute dissection work. It is good to know the key characters at this time to make sure they are visible. Just before adding the cover slip, I thin the edges of the resin patch with forceps holding a small amount of xylene. The cover slip should be dropped over the specimens from a low angle with one edge entirely in contact with the resin patch. It can be moved a little after this drop if necessary and additional resin can be added to completely fill the area under the cover slip. I often use clean neoprene stoppers to hold down the cover slips for initial drying.
Final Steps
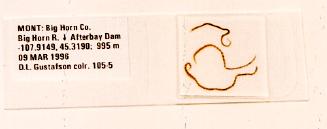
The slides should be marked with the label code and kept flat and undisturbed in a dust free area. They may take weeks to completely dry, but this is greatly accelerated in a small oven at very low heat (barely too hot for prolonged hand contact). A permanent label should be glued to the slide as soon as the slide is cured.
23 MAR 1996 Updated on 15 APR 1996 D.L. Gustafson